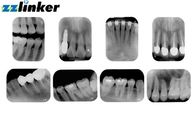
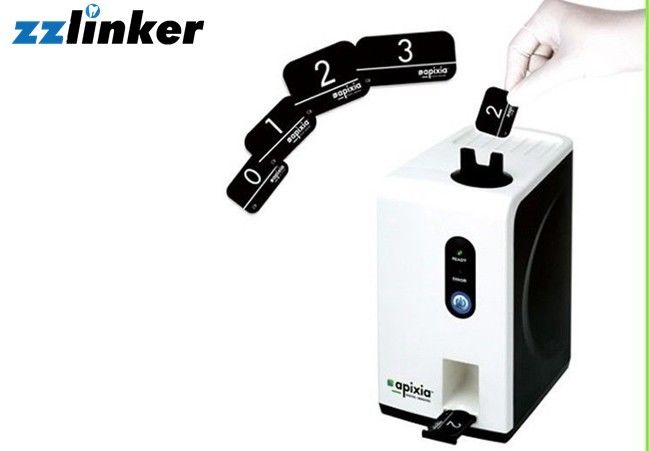
USA Apixia Dental X Ray Machine PSP 3D Scanner
Specification:
| Dimension: |
258 mm x 138 mm x 183 mm |
| Weight: |
3.6 kg |
| Voltage Requirements: |
AC 100-240 V AC 60/50 Hz |
| Scan Time: |
10 seconds |
| Resolution: |
17 lp/mm |
| USB Cable Length: |
1.8 meters |
| Connection Type: |
USB 2.0 |
Computer System Requirements:
Note: Computer not included
Windows Versions
Min. RAM
Min. Video
Card Min.
Hard Drive Space
Monitor
Other |
Windows XP, Windows Vista, Windows 7,Windows 8, 32/64 bit
512 MB, 1 GB recommended
Pentium4 CPU or better
SVGA 1024 x 768
40 GB
High Quality Display (Flat Panel or CRT)
recommended. 1000:1 Contrast Ratio and 0.255 dot
pitch recommended
Backup System highly recommended. High Speed Internet is suggested for enhanced technical support assistance. |
| Plate Sizes: |
Sizes 0, 1, 2, 3 |
| Gray Level: |
14 bit |
| Limited Warranty: |
Two Years Parts and Factory Labor Limited Warranty. See Warranty for more details. |
| Regulatory: |
US FDA, CE, IEC 60601-1, IEC 60601-1-2 |

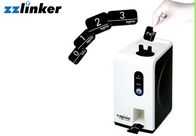
How to Takeing An X ray Image
1. Placed the sealed plate envelope with erased plate inside and
3. Take the exposed plate out of plate box and drop the plate into
position in patients' mouth as you would regular x-ray film.
the correct sized plate guidance slot (Figure 10).
(Black side of barrier envelope should face the X -ray Tube.)
4. The machine will automatically scan the image when plate is
2. Take an x-ray exposure then remove the plate from mouth.
inserted. (Be sure to handle plates along with edge with thumb
and forefinger to avoid scratches to the plate surface)
(The x-ray dose will be similar to a generic D speed intraoral
5. Wait until the PSP scanner LED ready light turns green to
flm depending on type of x ray system used; actual dosc may
insert another plate. Press the plate down into the machine at
vary)
3. Repeat steps 1 and 2 until all x-rays that are required have
anytime if necessary.)
been taken.
6. Verify plate has been accepted by observing the plate being fed
4. Disinfect hygenic plate envelopes with disinfectant soap and
into the scanning device. An audible click can be heard once
plate scanning has initiated.
water.
7. Repeat steps 1-5 until all exposed plates have been scanned
SCANNING THE EXPOSED PLATES
into the PSP scaner.
How to Installing The scanner:
1. Conect the suppied USB hub to the USB port of the computer.
2. Connect the supplied USB 2.0 wire to the rear of the PSP scanner
and then to the USB hub connected to the computer.
3. Connect the power supply adapter to the PSP machine electrical
input on the rear of the unit.
4. Connect the line cord between the main outlet and the power
supply. The scanner is now ready to be turned on.
5. Press the power button to turn on the PSP scanner. The power
button will iluminate blue to indicate the machine is on.
6. If the drivers have been installed correctly, Windows will detect the
PSP scanner as a new USB Device and the Found New Hardware
Wizard will appear.
Note: The Found New Hardware Wizard may appear each time you
plug the unit into a diffcrent USB port on the computer.
7. Choose from sizes 0, 1, 2 or 3 plate guide slot to attach to the top of the
machine (Figure 1).
8. Pull the receptor tray out (Figure 2) and turn on the PSP scanner.
Contact Us:
DepartmentDaisy Dai(Ms)/Export
Linker Dental Group Limited
Web: www.zzlinker.com
Skype: zzlinker3
Email: daisy@zzlinker.com
Mobile/whatsapp/wechat:0086 13849058625
 Your message must be between 20-3,000 characters!